How to Manage a Winter Garden
The best thing about winter salads is how easy it is to obtain a harvest. Cold months mean chores don’t have to be done in the heat, plus the pests and diseases are mostly dormant. You can’t beat the satisfaction of walking into the kitchen on a gray day carrying an armload of vibrant produce!
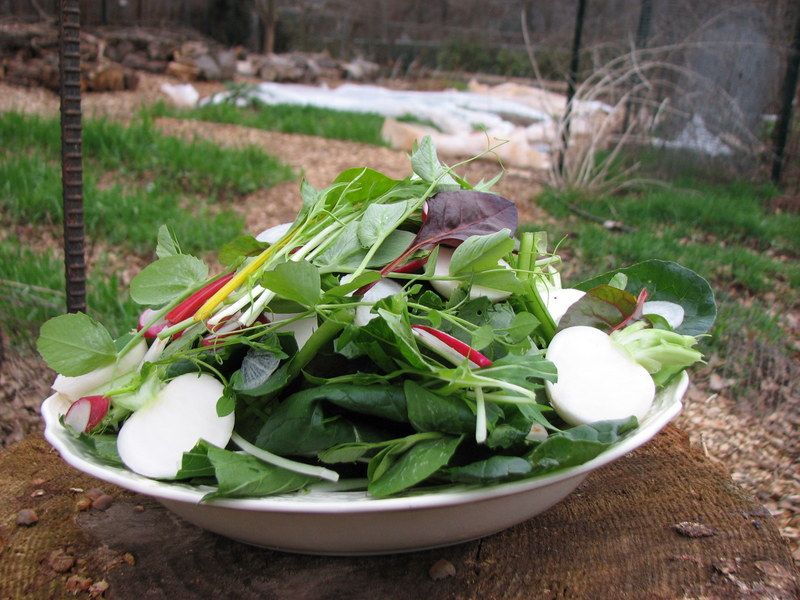
Photo Caption: This salad is composed of various greens, pea shoots, ‘Hakurei’ turnips, and radishes.
Winter gardening at Appalachian Feet is a combination of extending the growing season with cold-hardy varieties and frost protection while preparing beds for next season’s crops. It’s a great time of year for site selection, soil preparation, and choosing plants.
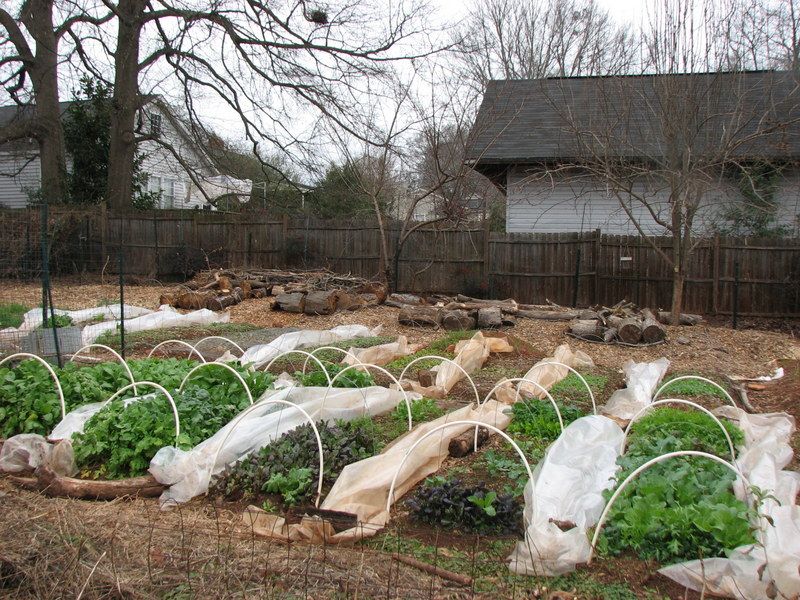
Photo Caption: UV plastic on low hoops provides protection for our winter crops. On the boundaries of the property we’re building hugelkultured keyhole beds.
For a long time now, the center of our yard has been a series of branching pattern rows. These were useful for crop rotation, but we’ve become skeptical of its benefits in a small scale polycultured garden. Our thought is that plant guilds and an exceptionally healthy soil food web will do a superior job of keeping plant illness at bay. Both our old and new designs have three main pathways that act like arteries for wheelbarrow supplies. The new design will involve more keyhole beds than straight rows, and some strategic swales for rainwater collection.
Instead of drip irrigation, we’ve decided to go with more hugelkultur. Our neighborhood is a bounty of unwanted wood (people pile it on the side of the road) and it takes us less than an hour to drive around and fill the truck bed with logs within a mile of our house.
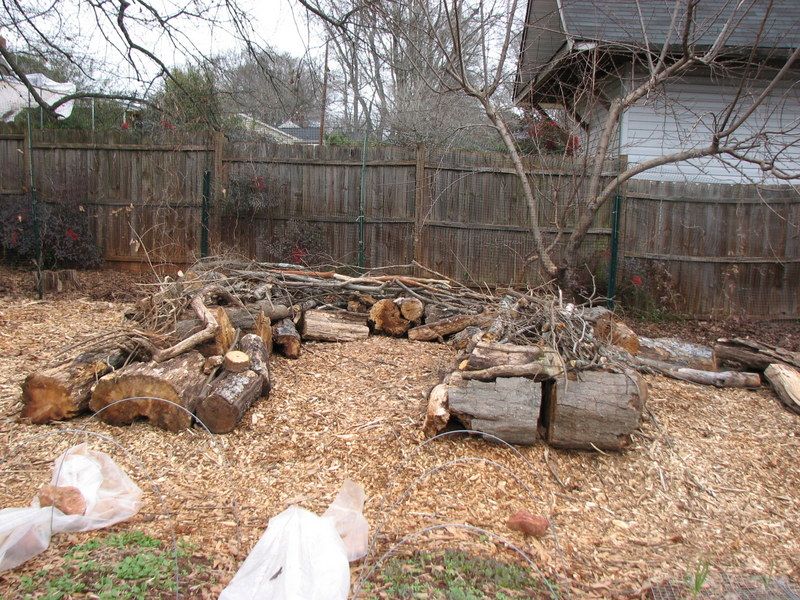
Photo Caption: We’ve inoculated the wood in these keyhole beds with edible oyster mushrooms. In the next few weeks we’ll finish stacking the wood and add lasagna gardening layers on top to compost before spring. We’re also using the height of the hugel beds to block the chicken’s view of the garden — their run is behind the logs.
Keyhole beds are designed to optimize growing space vs. space “wasted” on pathways. Paths can have plenty of stacked functions (we use ours for composting, growing mushrooms, travel, and burying irrigation lines), but on a small property, growing space is even more valuable. The idea is that every space in a bed is able to be reached for planting, weeding, harvesting, mulching, and other maintenance with the least possible area devoted to pathways.
Another goal for some of our keyhole beds is for their height to block our chicken’s view of the garden. The saying “the grass is always greener on the other side of the fence” was derived from livestock being able to see what they are missing. If they can’t see juicy tomatoes hanging on the vine or brilliant greens just waiting to be savored, they don’t feel as inspired to attempt an escape. We had considered buying a roll of 2′ high plastic to run along the bottom of our chicken fence, but we’d much rather use hugel beds to obscure the view. As an added benefit, we can plant crops chickens like to eat along the fenceline so they can peck the leaves through the fence holes. A little comfrey bocking #4 and coppiced mulberries ought to make them much happier than plastic sheeting.
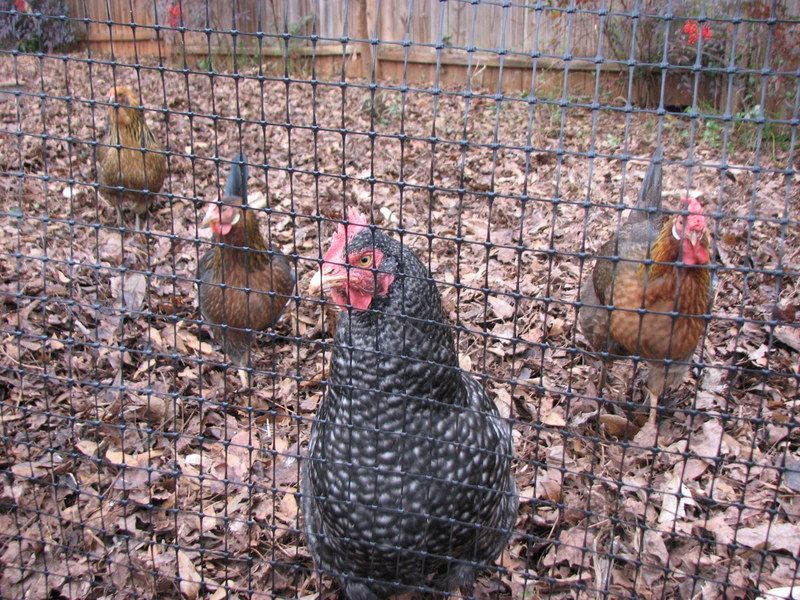
Photo Caption: “Give us all your comfrey!” We put our chickens next to our neighbor’s fence to control the English ivy, periwinkle, Japanese honeysuckle, Carolina snailseed, greenbrier, poison ivy, autumn clematis, and other weeds that like to creep in under the fence. It took our ladies two years, but they are finally making headway on the vine problem. Last month we filled their run with the never-ending supply of leaves from our neighbor’s curb. The chickens are very happy with this worm-promoting litter, plus the mulch keeps the soil soft enough that the chickens have an easier time scratching up weeds. They also enjoy radish greens and other root veggie tops which we toss over the fence before carrying our harvest inside. Between these foraging options and their constant access to our compost pile, the chickens barely touch the commercial feed we supply them with.
Our chickens have enjoyed a little company lately, due to an adjacent neighbor acquiring their own chickens. Someone knocked on our door today to tell me that chickens were on the loose down the street. I wish I had a picture of his look of surprise when I said they weren’t my chickens! This is one trend I am happy to spread around. Also, if you’re worried, our neighbor’s chickens are now safely back in the coop.
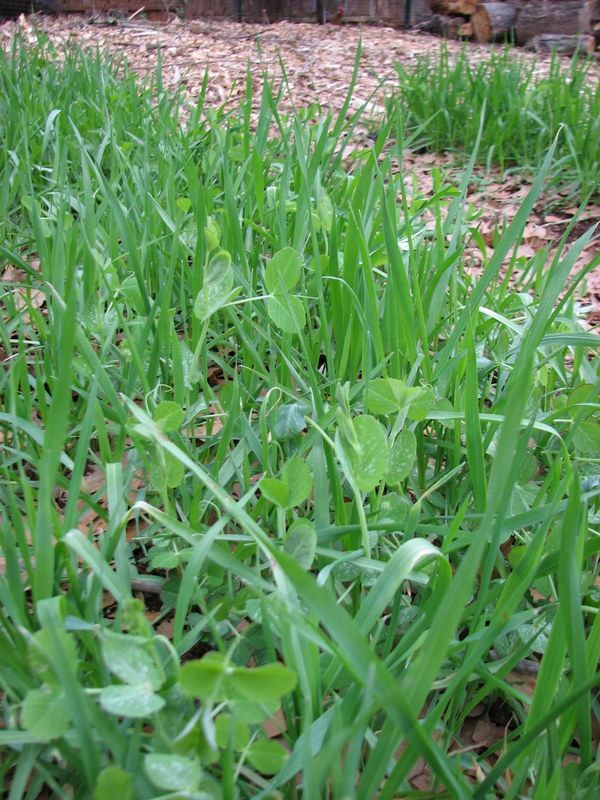
Photo Caption: Our chickens are also enjoying cuttings from our cover crops. This photo is of milky oats and Austrian winter peas. We’re also growing winter rye, vetch, favas, and clover.
Cover crops are another great way to use the winter garden. You get to build soil, thwart weeds, retain water, and potentially harvest a small crop. We pinch tender shoots off the Austrian winter peas to put in salads, and we’ll be using milky oats for tea and medicine in the spring.
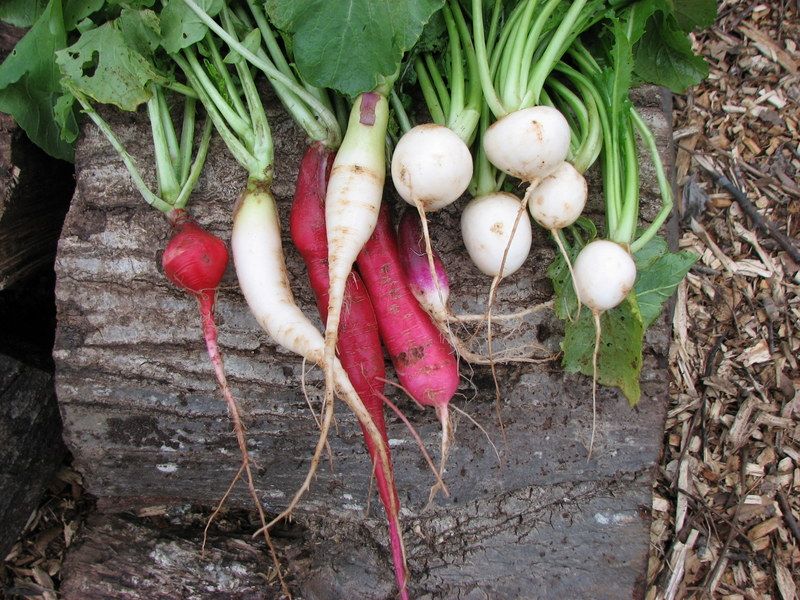
Photo Caption: Root vegetables and greens are at their peak performance in a winter garden. If you’ve ever had trouble growing carrots, celery, radishes, turnips, lettuce, beets, spinach, or cabbage you should try them in the winter.
Most people don’t realize the myriad of crops that do well in winter gardens. We’re currently growing kale, collards, raab, broccoli, cauliflower, kohlrabi, cabbage, Chinese cabbage, bok choy, tatsoi, mizuna, arugula, salad radishes, daikons, rutabagas, turnips, lacy mustards, regular mustards, minutina, beets, spinach, lamb’s quarters, fennel, celery, carrots, cilantro, chervil, parsley, parsnips, scallions, endive, radicchio, chickory, lettuce, mache, chickweed, and more.
The majority of winter crops are easier grown directly in the ground from seed. Use more seeds than you think you’ll need and thin them to the proper spacing. Once the crops start maturing, you can harvest the largest plants to provide more room for the remaining plants to grow. For example, we plant our turnips closer than the recommended spacing and begin harvesting baby turnips when they reach ping pong ball size. As the crowded beds are thinned, the remaining turnips can reach sizes as great as a softball.
We also try to reduce kitchen preparation by taking care of some of the chores while we’re still outside. Turnip and beet greens are prized in our kitchen, but we’re less excited about hairy radish leaves. These get pulled off and fed to the chickens as a treat before we ever enter the house. Another trick for pre-prepping veggies is our winter rain bucket. In the winter, we don’t have to worry about mosquitoes infesting standing water. Leaving a bucket in the garden means we have a handy place to dip muddy root vegetables; thus, very little soil makes it into the kitchen. This water can also be used to irrigate thirsty plants.
Salad greens are harvested right into our salad spinner. Just a few snips with the scissors and we only have to rinse and spin.
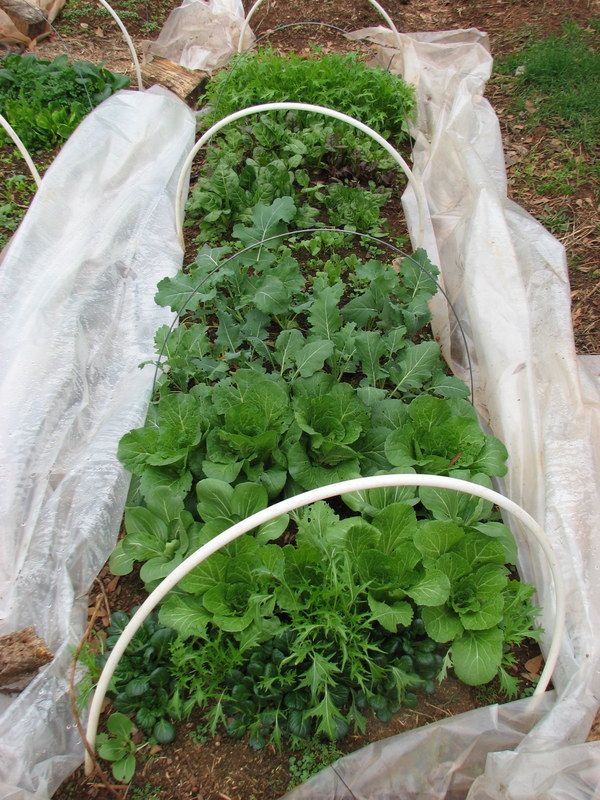
Photo Caption: PVC pipe is one option for building low hoop beds. We also use flexible steel rods made for this purpose.
The beauty of low hoops are their low tech nature. You just need some sort of hoop frames (a smooth, curved edge is easiest to pull plastic on and off) and UV resistant plastic. All the heat comes from solar activity, no electricity is required. The rows should be covered when temperatures are below 50 ° F and removed when temps rise above 50 ° F.
It’s important to leave the plastic on when temps are below 50 ° F, even if your veggies can take freezing temperatures. Plants that take freezing temperatures are not actively growing when they are that cold. They survive, but just sit there. If you want winter veggies to ripen in the coldest months, row covers are required to keep them warm enough for active growth.
We watered daily from the time of sowing until the plants reached 2″ in height. After that, we mulched lightly and have mostly used rainwater for irrigation. Winter gardening requires more attentiveness to weather reports in order to plan when the covers should stay on or not.
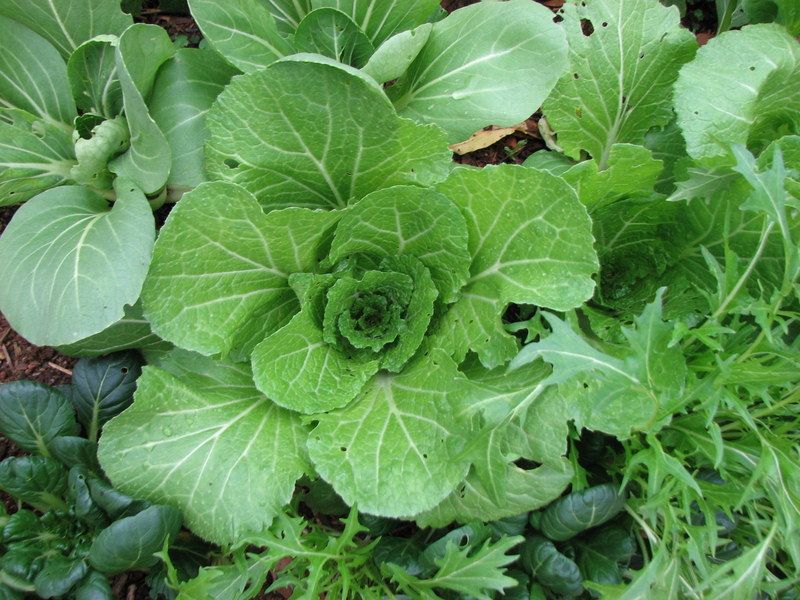
Photo Caption: Weather variations make heading cabbages and lettuces some of the more challenging veggies to grow successfully in the south. We like to grow Chinese cabbages and loose-leaf lettuce varieties which are more reliable producers in mild weather climates.
Winter crops have few pests (no cabbage worms!) but do occasionally get aphids and slugs. If infestations get bad, try leaving the cover off hardier plants on a frosty (but not freezing) night to reduce the population. For aphids, you can also purchase mailorder ladybugs and release them under the plastic. If you’re lucky enough to have ducks, run them through your uncovered plants to take care of the slug problem.
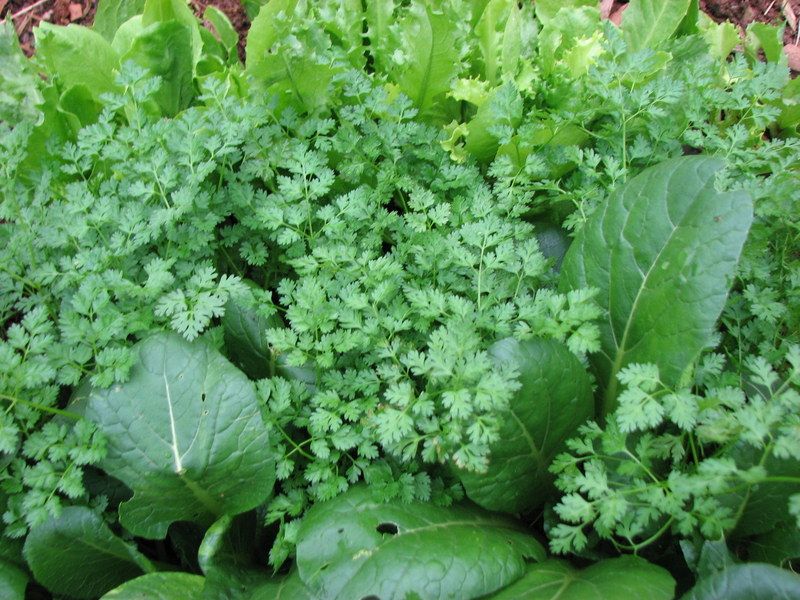
Photo Caption: Chervil is a delicately flavored herb prized in French cooking. Sow it outdoors in February or under plastic all winter.
Winter weeds are another issue under low hoops. We remove volunteer seedlings like purple deadnettle, henbit, and speedwell before they set seed. We usually leave chickweed unless it is crowding a crop we want more. Try some chickweed in your salad and you’ll see why!
Our favorite source of seeds for the winter garden is Seeds From Italy. When it comes to broadcasting large beds of spinach, lettuce, or carrots we don’t want wimpy seed packets with less than a teaspoon of seeds in it. Seeds From Italy still provides impressively ample seed packets at a home gardener price.
Want a chance to taste-test some of this pretty produce? Sign up for our expert gardener class series or pick a different topic from the schedule!

4 thoughts on “How to Manage a Winter Garden”
Comments are closed.
Mark Willis
Twitter: marksvegplot
- January 1, 2014 4:09 am
That’s a great artcle, Eliza. Full of useful advice – and the pictures of the produce speak for themselves! Unfortunately my wife doesn’t like any of the oriental brassicas like Mizuna, Pak Choi etc, which restricts my options a bit when it comes to Winter salads. We’re very keen on chicories, and they do well in Winter, so they form the basis of most of our salads at this time of year.
Mark Willis´s last blog post ..A canal-side walk
sebastian - January 15, 2014 5:34 am
Wow!!! Wish I had this much going on in my garden, but we live a little farther north and it’s just not possible. Even if nothing’s visibly growing, though, there’s lots of life in the garden this winter because I used some of the downtime to read up on how to squirrel proof a bird feeder, and now we’re getting lots of sightings. They’ll help keep the bad bug populations in check, too, come spring.
sebastian´s last blog post ..Heritage Farms Absolute II Squirrel Proof Bird Feeder
David - January 25, 2014 3:22 pm
Great post! These are some wonderful tips, I’ve been wanting to do a winter garden for a while now, but I’m always afraid it will be too cold. Hopefully spring come soon!
Pingback: News: Eliza on TV, Upcoming Events, and Our Favorite “How To” Articles | Appalachian Feet